WOO WOO WOO! YOU KNOW IT!

Production Blog of an Animation and Special Effects Student
Showing posts with label Animator. Show all posts
Showing posts with label Animator. Show all posts
Thursday, 12 May 2016

Tuesday, 10 May 2016
One for Long Island
Hey all! Been doing some more 3D this morning. I started with a bit of reference footage of throwing up the LIs. Using the footage, I came up with this:
Note: This is a Playblast render, not representative of the final render.
So from here, I'll be adding some more motion, as I've just done the key poses. Then I'll be cleaning it all up.
After this one is finished, I'm thinking possibly a Broski Boot, then a Rough Ryder (separate clips). Give the "Beefy" model a KO vest, perhaps? Then, if I'm feeling brave, finish off with a Pop-Up Powerbomb?
This is all future, though. Let's go a step at a time.
WOO WOO WOO! YOU KNOW IT!
Saturday, 27 September 2014
Tuesday, 23 September 2014
LCD Effect Title
As you can see, I've updated my title image with a new one!
The LCD is made in After Effects using the CC Ball Action effect. The main board is actually two instances of CC Ball Action, one for the larger grey ones, another smaller white one off center to give it a 3D look.
The text is also two layers done in the same style, larger coloured instance, smaller white one, which remains central, to give it the look of that is where the light is more intense. I also added glows to the text
I animated it using a mask, generating a fill on it, then key framing the End setting, 0% at the start, 100% where I wanted it to finish. The flickering is just alpha-ing the Precomp I used for the Text for quickness.

The light is added from a Gradient Ramp and the grime is an image which I altered the levels of and Screen Blended to give the illusion of the display being behind an old, dirty and scratched screen.
The LCD is made in After Effects using the CC Ball Action effect. The main board is actually two instances of CC Ball Action, one for the larger grey ones, another smaller white one off center to give it a 3D look.
The text is also two layers done in the same style, larger coloured instance, smaller white one, which remains central, to give it the look of that is where the light is more intense. I also added glows to the text
I animated it using a mask, generating a fill on it, then key framing the End setting, 0% at the start, 100% where I wanted it to finish. The flickering is just alpha-ing the Precomp I used for the Text for quickness.
Using a 3D layer on the full LCD display (back and text) I manipulated the angle to get my desired one.
I moved the text to the top left of the LCD board layers so when I angled the precomp it would not be cut off the edge of the screen and also because changing the angle was giving areas where no LCD sections were.The light is added from a Gradient Ramp and the grime is an image which I altered the levels of and Screen Blended to give the illusion of the display being behind an old, dirty and scratched screen.
Final Video of Test 01
Moving forward, I will add a Depth of Field, but the Ball Action isn't recognised for the DOF, so I will have to simulate it with a Camera Lens Blur and create a DOF mask.
Saturday, 22 February 2014
Muscle Rigging - Week 3
We have been looking at adding muscle rigs to the meshes. It is not necessary to fully rig up the zombie rig with muscles, but I will be looking at adding a couple muscles to it. Especially to the stomach, so I can emphasise the stomach movements.
To practise, we were given a "Muscle Man" rig.
I took looked around online for some muscle diagrams.


To practise, we were given a "Muscle Man" rig.
I took looked around online for some muscle diagrams.
This image is from http://anatomy.askthetrainer.com/ - a training and fitness website.
I chose this image for the simple fact it gives you both front and back diagrams. I also went and printed this out to keep on my wall next to the computer so I can see the muscle system with just the turn of my head! A nice tip for everyone.
The muscles are set up with a series of clicks from the MuscleStrand option, under CAT Objects.
Under the modify tab, there are options for editing the muscle. I have set the muscles to Bones and to allow Squash and Stretch. Squash and Stretch will allow the muscles to flex when they are linked to the CAT rig.
I have named the first muscle Pectoral01, as this will make it easy to keep track of what muscle is what should I need several muscles on the rig. It's a good habit to get in to.
I placed the muscle over where I needed it to be, in this example, over the chest and leading to the arms/shoulders.
By relaxing the muscle with this setting, I can keep the rig inside the mesh and will allow an impressive flex. I then connected the muscle to the ribcage and the upper arm.
I keyframed some animation, the arm lowers and then raises right up, then back to the starting position. This screencap shows the muscle being stretched.
I also added a second muscle to work as the muscle between the shoulder and the neck, the Trapezoid.
When the arm was raised too high, the mesh would crumple, like this. I couldn't correct it with weighting, so I lowered the arm in the animation. This sorted it out.
As I had done with the zombie mesh when skinning, I added the muscles to the bone list, then began to edit their weighting. I used the Paint Weighting tool for this as it is a high poly mesh.
This is a render of the muscle rig.
I will want to go back and alter some of the weighting and maybe even the location of the trap muscle slightly. I would also alter the animation slightly, making it more of a Lateral Raise. This would move the pectoral muscle slightly, and the trap much less (unless his form was off, in which case his trap would be being worked more than his lats. Bro, do you even lift?)
To do this, I would be using workout tip videos, like this one by Matty Fusaro who talks you through the yes and no's of Lateral Raises.
http://www.youtube.com/watch?feature=player_detailpage&v=HJG-gvG2N5E#t=177
I wanted to add the Bicep into the rig and have him flex his muscles in the final render.
Sadly, it destroyed the mesh.
It puts me in the mind of the cartoons, where a weak character flexes and his muscle drops down.
The final render with the weighting corrected and bicep removed.
Saturday, 15 February 2014
Model Rigging - Continued
Using the Zombie model, I have continued to rig.


Knee weighting. I have to make a smooth transition between the back of the knee and the calf. I could kind of get away with some errors because of the way the knee bends, it covers a large portion of the mesh/leg. I got it as close to real as I could, however.
The next step in correcting the weighting was the thigh. Blending the two portions of legs helps to give a smooth transition. There was a portion of knee which hung low, as can be seen above.
To correct the knee, I blended a little more on a lower set of vertices.
This fixed the knee problem.
I altered the weighting on the bottom of the leg, so the foot wouldn't affect the cuff of the trousers so much. It gives a slight movement, which would happen in real life. Give it a shot, go on! Rotate your foot and watch your cuffs. (Don't bother if naked or wearing shorts)
To make the mesh symmetrical, I cloned the mesh. This one was named zombie_proxy, so I know which the make the edits to.
I used the Symmetry to make "fix" the mesh. It has removed the untucked shirt portion. This will be added at a later date.
I enabled Mirror Mode so I could copy the data across to the opposing limbs.
To rig the hips, I select the full area and give it a weight Value of 100%, so I know which areas I am working with.
Since the hips and thighs will affect each other I go back to the thigh and blend with the hips.
The side of the hips and the bum of the model began to get infuriating. I had to edit so much of it to make it work properly. To remove the stretching I had to use a lot of low values. There was a margin of error which I could use, as when the thigh raises to 90 degrees, the skin folds on the top of the thigh slightly. This allows a slight margin of error which I can work with.
I mirror the mesh again, but there are some slight changes which need to be made as they have not mirrored exactly.
Altering the Mirror Threshold I can get the sides to match up properly. I have highlighted the area which needed to be changed.
In the end, I get a set of hips with equal weighting.
When weighting the mesh, I found it to be a strange process. When editing two areas at once, it can seem like swimming against the current, but then, all of a sudden, it clicks right into place. Once I managed to get my head around it, I found it a pretty simple process.
Thursday, 13 February 2014
Re-targeting and editing Motion Capture Footage
http://eat3d.com/free/mocap_cleanup
Eat3d have a tutorial that I will be looking at for the Performance Capture module.
I will update this post as I find more.
Eat3d have a tutorial that I will be looking at for the Performance Capture module.
I will update this post as I find more.
Friday, 7 February 2014
Skeleton to CAT Rig

If I match the amount of bones on the CAT rig to around that of it's human counterpart, I should be able to recreate a very smooth arch in the back.
The picture I have attached here is a composite of the CAT and a skeleton. The RIG is slightly off, as I didn't make this RIG for the skeleton. It is the one I used in the Spiderman test. Something to note with Superheroes design is that they are often made much taller that "regular" humans. Their limbs are often slightly elongated, or in some circumstances, reduced.
Thursday, 6 February 2014
L5 - Digital Visual Effects - Scene ideas.
This project involves working as a team to recreate the VFX from a scene in a film.
The group is;
Phil Baggot - Phil's Blog
Shaun Fontaine - Shaun's Blog
Chris McEwan - That's me!
We are all looking at scenes which we'd like to make, then pooling the ideas and selecting one.
Tron Legacy - Recognizer Scene - 0 to 40 seconds.
http://www.youtube.com/watch?v=ub4tJAJCpo4
There would be a lot of 3D Modelling involved with this scene. The buildings could be done through either Matte Painting or adding 3D modelling elements to video footage.
There would be some Blue Screen work, possibly.
Scott Pilgrim Vs The World - Todd the Vegan scene - 2:08 to 2:34, then 2:43 to 3:29
http://www.youtube.com/watch?v=nUbgQLGKXdM
Large clips and very likely insanely difficult to do, but would pretty damn cool.
There would be a small bit of blue screen work in the first clip, when Todd is hovering in the hole in the wall.
The hair would have to be simulated, which could be done in 3Ds Max. The green lasers and the de-veganise ray would be done in either AE or Nuke, as would Todd's glowing eyes.
UFO (2012) - Ship reveal scene - 1:07 to 1:14
http://www.youtube.com/watch?v=gU6XUD8tEOc
This is just the trailer, but I have the actual film (regretfully, but at the same time, not!)
The ship would be a 3D model and a shot of Leeds would be used as a clean plate.
Digital Doubles would be used for the crowds further down the street. This wouldn't really be an issue as they are out of focus, so detail isn't major. They could be animated in either Max or Motionbuilder.
Plus, this guy.
http://www.youtube.com/watch?v=gU6XUD8tEOc#t=127
Shaun of the Dead - She's So Drunk - 1:20 to 2:07
http://www.youtube.com/watch?v=PAyF7zmJXjA#t=80
The DVD extras show you how this effect was done. The pole is digital and the hole through the zombie is made through multiple layers in post.
The group is;
Phil Baggot - Phil's Blog
Shaun Fontaine - Shaun's Blog
Chris McEwan - That's me!
We are all looking at scenes which we'd like to make, then pooling the ideas and selecting one.
Tron Legacy - Recognizer Scene - 0 to 40 seconds.
http://www.youtube.com/watch?v=ub4tJAJCpo4
There would be a lot of 3D Modelling involved with this scene. The buildings could be done through either Matte Painting or adding 3D modelling elements to video footage.
There would be some Blue Screen work, possibly.
Scott Pilgrim Vs The World - Todd the Vegan scene - 2:08 to 2:34, then 2:43 to 3:29
http://www.youtube.com/watch?v=nUbgQLGKXdM
Large clips and very likely insanely difficult to do, but would pretty damn cool.
There would be a small bit of blue screen work in the first clip, when Todd is hovering in the hole in the wall.
The hair would have to be simulated, which could be done in 3Ds Max. The green lasers and the de-veganise ray would be done in either AE or Nuke, as would Todd's glowing eyes.
UFO (2012) - Ship reveal scene - 1:07 to 1:14
http://www.youtube.com/watch?v=gU6XUD8tEOc
This is just the trailer, but I have the actual film (regretfully, but at the same time, not!)
The ship would be a 3D model and a shot of Leeds would be used as a clean plate.
Digital Doubles would be used for the crowds further down the street. This wouldn't really be an issue as they are out of focus, so detail isn't major. They could be animated in either Max or Motionbuilder.
Plus, this guy.
http://www.youtube.com/watch?v=gU6XUD8tEOc#t=127
Shaun of the Dead - She's So Drunk - 1:20 to 2:07
http://www.youtube.com/watch?v=PAyF7zmJXjA#t=80
The DVD extras show you how this effect was done. The pole is digital and the hole through the zombie is made through multiple layers in post.
Tuesday, 4 February 2014
Rigging a CAT rig
As I will be using 3Ds Max for animating the character, I went to Youtube, then to the 3D Studio channel. They have a whole heap of tutorials in their library. I will be using THIS video to help me with my Rigging.
One change I will be making is by adding an extra "bone" to the forearm. This was a suggestion by my animation tutor. It stops the entire forearm from twisting when you rotate the wrist. Try rotating your wrist. See how very little of the forearm near the elbow twists? You could even argue that it is simply a muscle bulge making that area move. It's because by twisting your wrist, your Ulna and Radius are moving in your arm, along with the Carpus (wrist).
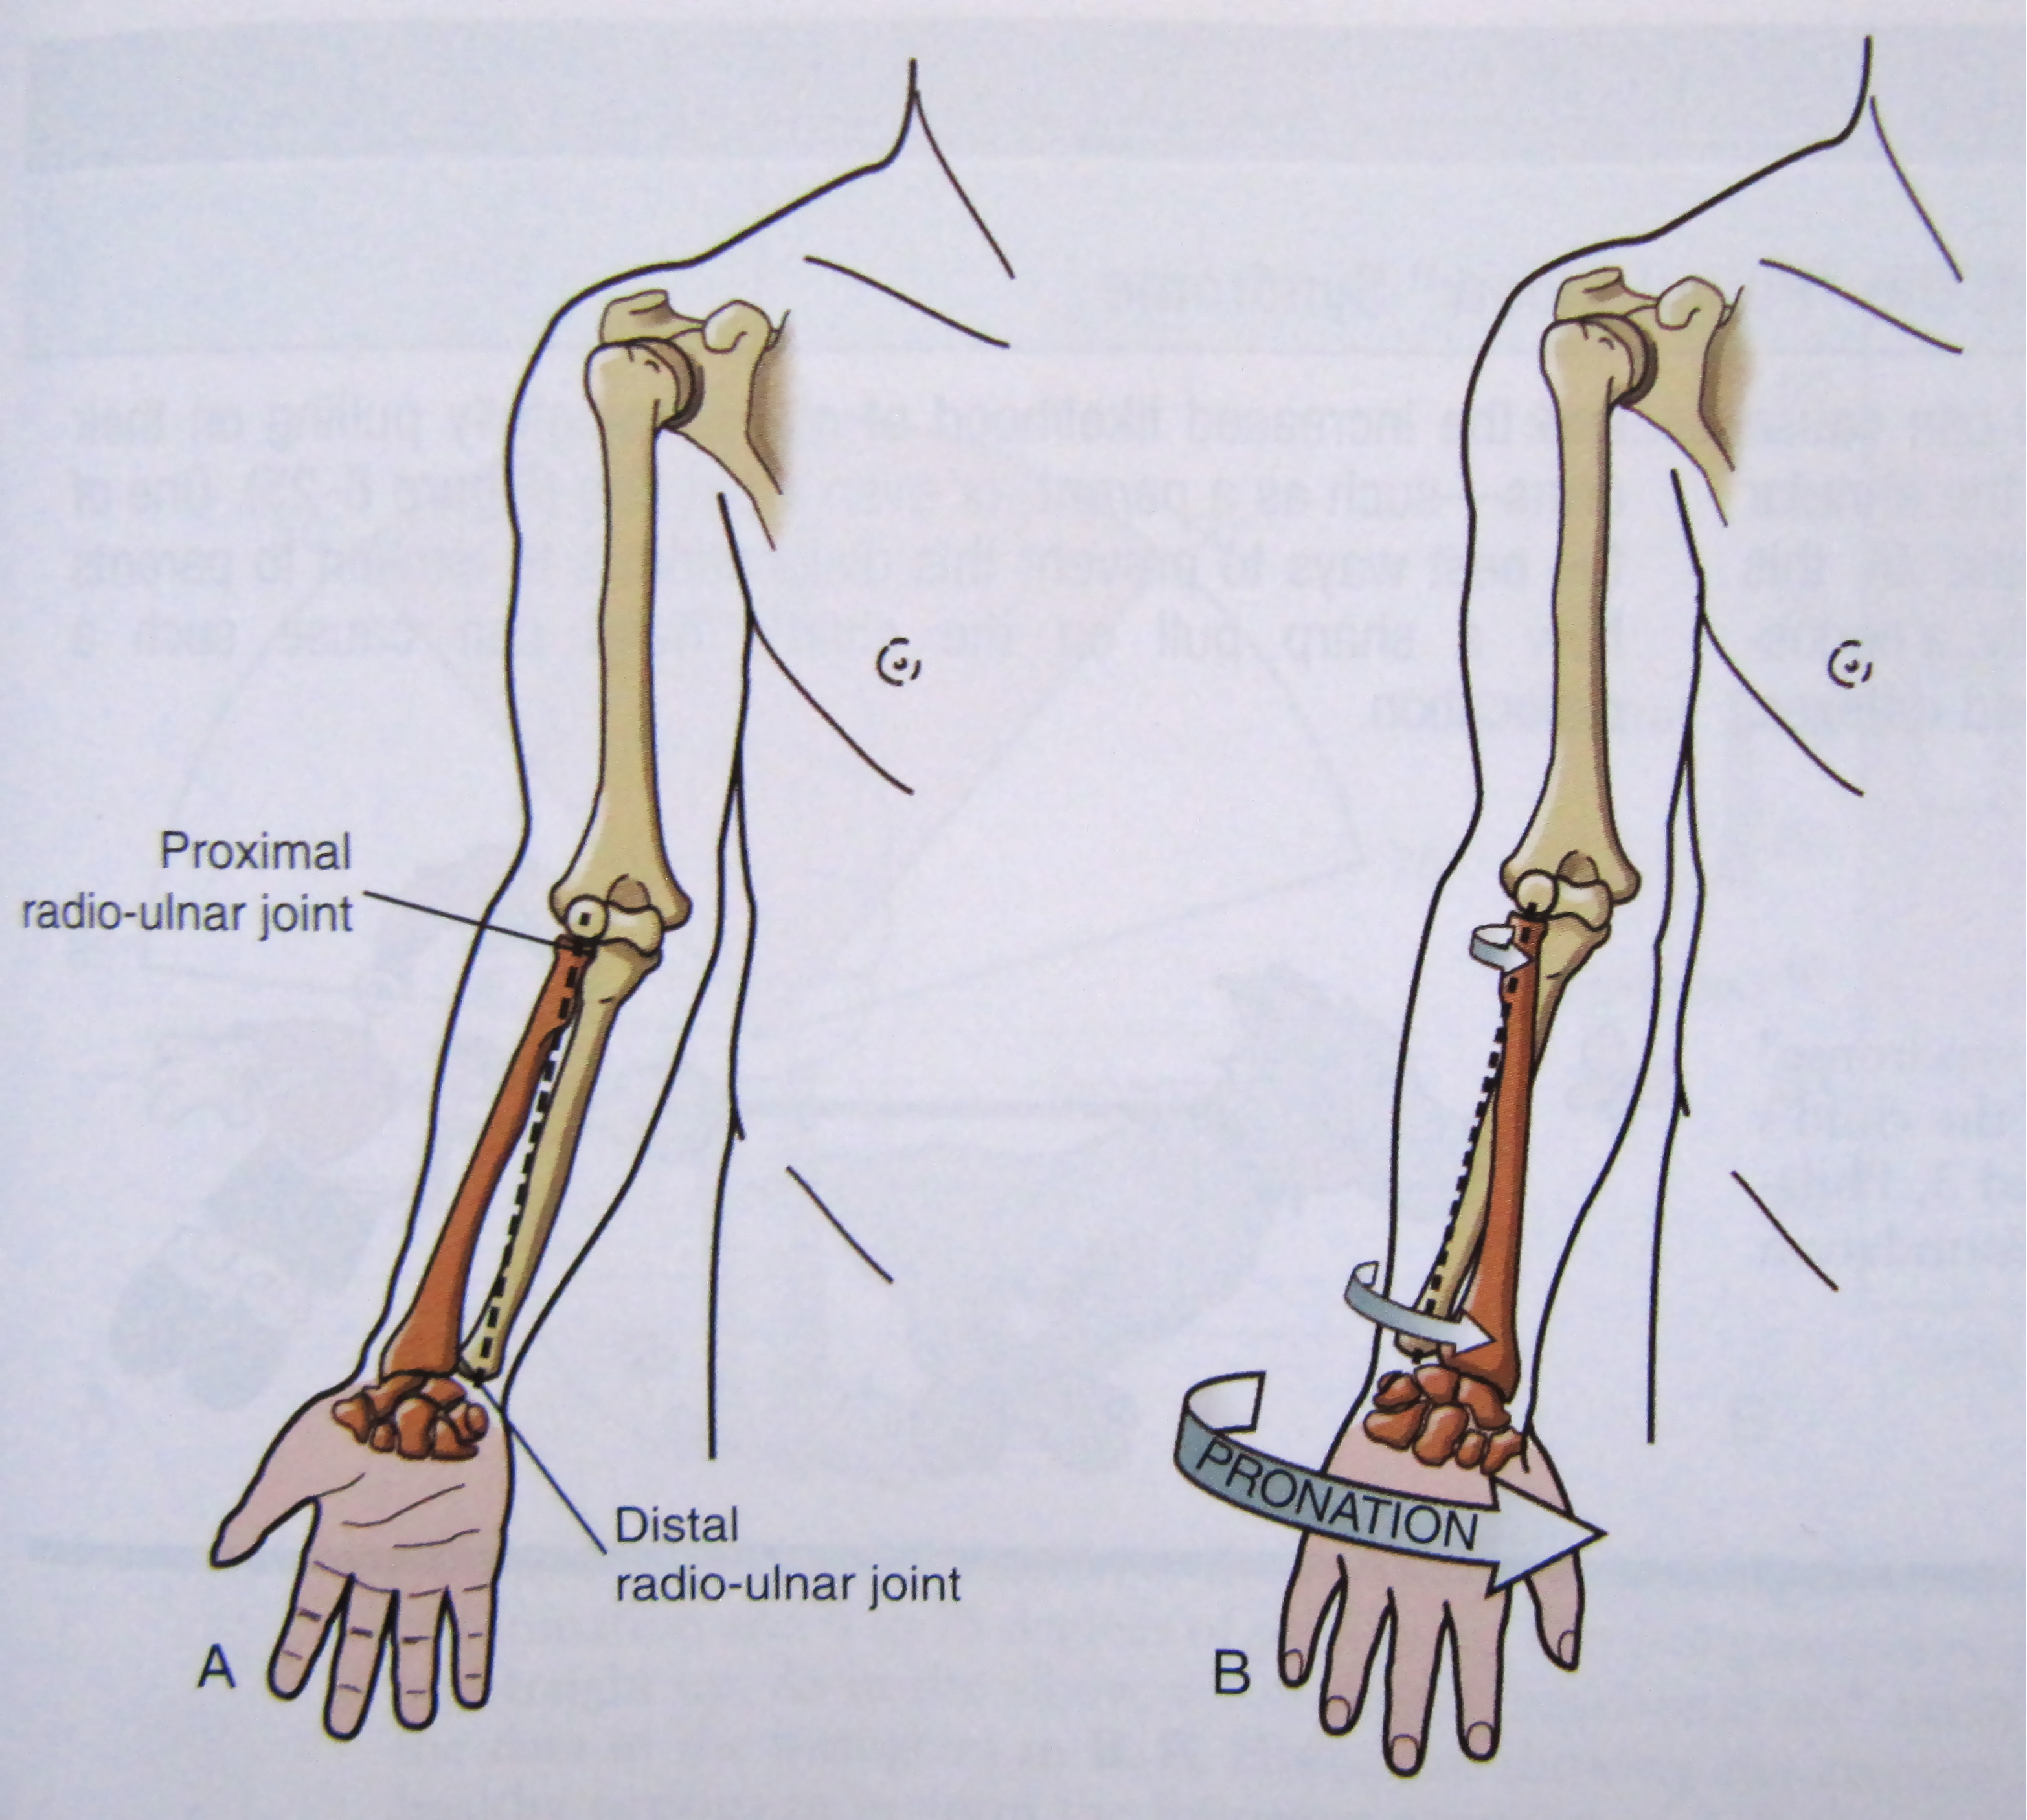
This image, from Doctor Bruce McFarlane's BLOG, ITTCS, shows how the Ulna (shown in RED) and the Radius bones move when the wrist rotates.
I will update this post with my CAT rigging attempt from following the 3D Studio tutorial, with the adjustment I mentioned.
UPDATE:
I have rigged and partially skinned a model. I have not altered the Envelopes, so there is a lot of strange action going on, like stretching and the thighs morph rather bizarrely.
I have also documented my process with a series of Screenshots.
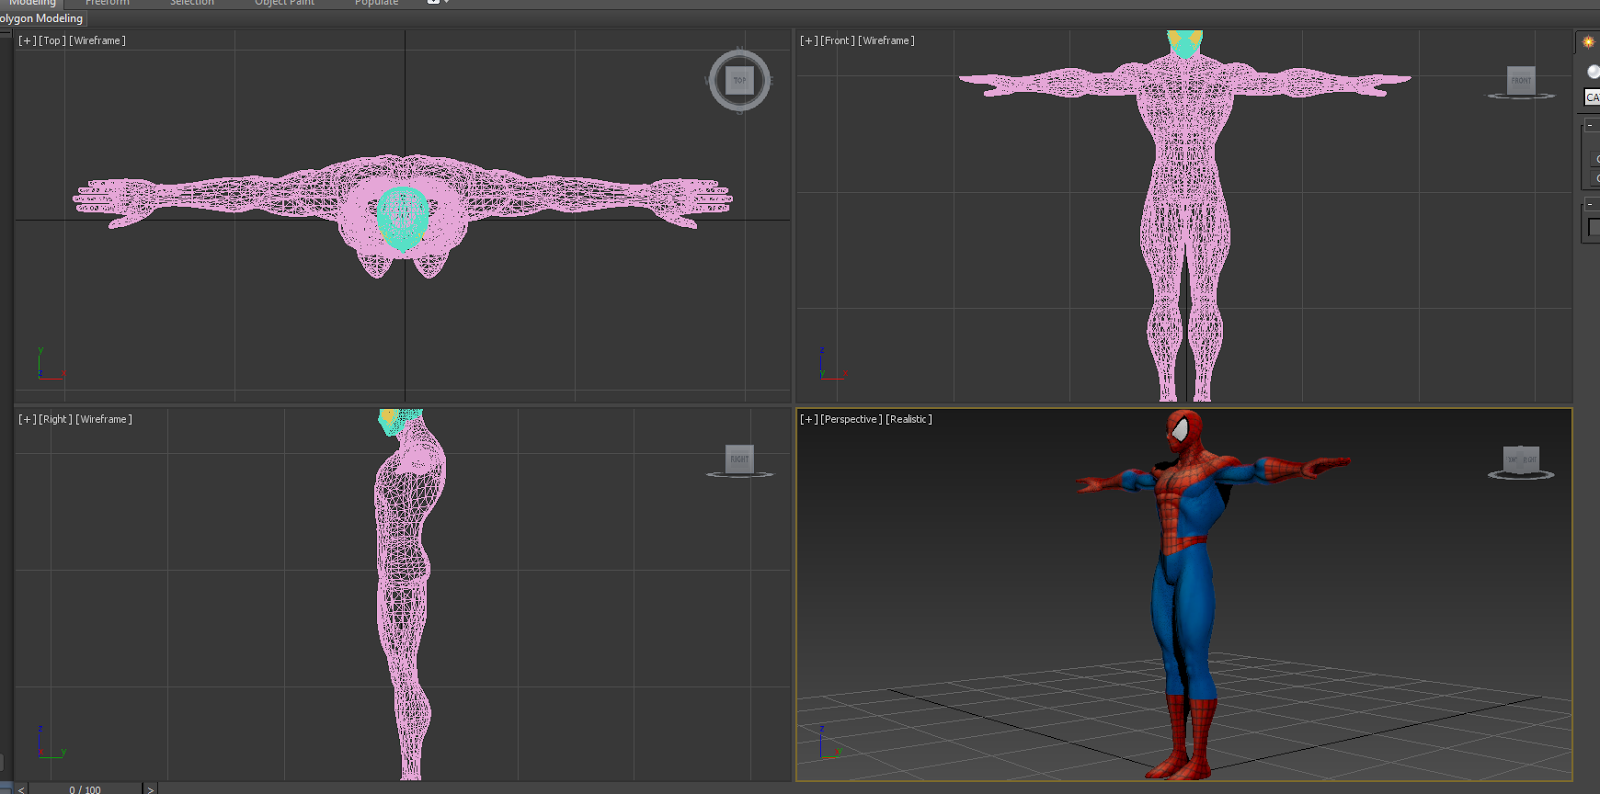 |
| Firstly I opened the Mesh file up. Spiderman is stood in a Tpose |
 |
| Selecting the Mesh, I pressed Alt + X to enable X-ray mode. I froze the mesh at this point for ease of rigging. |
 |
| I created a Base Human CAT rig from the Helpers Section |
 |
| In side view, aligned the rig with the meshes waist. |
 |
| CATUnits Ratio alters the height of the rig. I renamed the rig Spiderman_ so all of the components would be names, for example, Spiderman_LeftFoot |
 |
| I resized the waist to fill out the mesh and help aligning the legs. I also rotated it slightly. Using the Copy and Paste Mirror buttons, I placed the Legs. I also added an extra Bone to the feet. As the model is wearing boots, I don't need to make all five toes. |
 |
| I align the spine and neck to follow shape of the mesh. Moving the ribcage resizes the spine bones automatically, as does the head with the neck bones. |
 |
| I resize the ribcage to better fill out the mesh. This will help when it comes to setting the enveloping areas of skinning. |
 |
| Aligning the arms, I moved the collarbone slightly, then began setting the arms. I added the five digits to the hand and resized them using my own hand for reference, lining up the knuckles. I added an extra section on the forearm to represent the Ulna and Radius bones. |
 |
| Copy and Paste Mirror to set the other arm. |
 |
| This is how the mesh and model look when combined. I select the mesh, then apply a Skin Modifier. |
 |
| I use the Spiderman_Pelvis selection as my bones, then Ctrl+C to select all of the Children files within. This contains all of the bones I need, leaving out the Footpads and the main selector (the triangle with the arrow). As the mesh is separated for the neck, head and the eyes, I do the same with them. Without this, those sections will not be animated. |
As noted above, there are lots of things to be corrected. I have just uploaded this to show my working so far. My next steps will be to adjust the enveloping sections to correct the stretching.
I used the Motion section to animate Spiderman with a Sneaking animation. I have hidden the rig contained within.
Saturday, 1 February 2014
Ragdolling
Here's a render of the Ragdoll test.
The model uses a Ragdoll solver to generate the falling. I resized the effectors - if any of them are in contact, the model will instantly drop and "twitch" - to create the collision points. Adding a Rigid Body solver to the wall and setting it to Passive (so it doesn't move when hit), when the model connects with it, the animation stops and the ragdoll process begins.
The more time I spend on resizing and moving the effectors, the better the result.
I'm already getting an idea of what I want to do for the Motion Capture piece which would incorporate some ragdolling, perhaps!
The more time I spend on resizing and moving the effectors, the better the result.
I'm already getting an idea of what I want to do for the Motion Capture piece which would incorporate some ragdolling, perhaps!
Tuesday, 28 January 2014
Chris Lackey Lecture
A lecture at University was taken by Chris Lackey, a man of many talents. Animator, Illustrator, Writer to name but three.
He gave a great look at crowd funding, using his experience from his graphic novel, Transreality. He also told us about freelancing, working for free and building a fan base (the last two being my questions). He agreed about parodies being a great way to bring attention to yourself and that you need to be careful when working for free. Basically, money and contacts are the keys.
If you read this, Chris, thanks for the lecture and tips!
Link to Chris Lackey's Youtube
He gave a great look at crowd funding, using his experience from his graphic novel, Transreality. He also told us about freelancing, working for free and building a fan base (the last two being my questions). He agreed about parodies being a great way to bring attention to yourself and that you need to be careful when working for free. Basically, money and contacts are the keys.
If you read this, Chris, thanks for the lecture and tips!
Link to Chris Lackey's Youtube
Meeting Tomska

I got the chance to ask him about building fan bases as large as those you find for animators, comedians and film makers that you find on Youtube. He simply told me to make some parodies and get them on Youtube. People will connect with the properties that they enjoy and you can begin to build fans from there.
He also said that in an upcoming video he will be making a video covering questions like this.
LINK TO TOMSKA'S YOUTUBE
Subscribe to:
Posts (Atom)