WOO WOO WOO! YOU KNOW IT!

Production Blog of an Animation and Special Effects Student
Showing posts with label Animated. Show all posts
Showing posts with label Animated. Show all posts
Thursday, 12 May 2016

Tuesday, 10 May 2016
One for Long Island
Hey all! Been doing some more 3D this morning. I started with a bit of reference footage of throwing up the LIs. Using the footage, I came up with this:
Note: This is a Playblast render, not representative of the final render.
So from here, I'll be adding some more motion, as I've just done the key poses. Then I'll be cleaning it all up.
After this one is finished, I'm thinking possibly a Broski Boot, then a Rough Ryder (separate clips). Give the "Beefy" model a KO vest, perhaps? Then, if I'm feeling brave, finish off with a Pop-Up Powerbomb?
This is all future, though. Let's go a step at a time.
WOO WOO WOO! YOU KNOW IT!
Saturday, 27 September 2014
Saturday, 24 May 2014
L5 Digital Visual Effects - Report
IN THE BEGINNING OF THE PROJECT:
When we formed our group, Shaun, Phil and I decided we would go and choose a few different sequences we would like to recreate and look at how they were made. We would then look at them all and see which we thought would be the best and most interesting to try. We opted for Gareth Edwards' monster film, Monsters. What really attracted us to this film was the way Gareth had made the film. It was done with very few people and he edited and composited the film himself with Adobe After Effects, a program we have access to, so we could get a very authentic edit of the film. Also, the monster rig he used was a modified Spider CAT rig in 3Ds Max. He simulated the tentacles with Reactor, however. This meant we could not use a modern version of 3Ds Max.
We worked out a work flow for what we would be making;
Offline editing
Taking BMD flat Log convert to Prores/DNxHD
Linear workflow
Mulitpass compositing including Zdepth
CGI will be rendered in OpenEXR
Planar Tracking
And we took a look at what problems we may run into:
Noise, Rolling Shutter, Difficult shot and the shooting style.
Noise:
The noise is able to throw off the tracking of shots. Noise is especially prevalent in dark shots, which is what our sequence is. If we raise the ISO to give ourselves a brighter shot, we are going to open ourselves up to more noise, so we have to be very careful and shoot on a lower ISO. Noise is always going to be there, but we can remove that in post. At the end of the sequence, however, we will add noise. This will keep the CG elements looking like they belong in the scene.
Rolling Shutter:
Unless the camera has Global Shutter, you will be dealing with this. The sensor scans from top to bottom, meaning that if the camera is moving side to side, your image is going to be skewed, like this: \
For our shot, however, we don't have to worry so much about this, as the majority of the shot will be steadied.
Shooting Style:
We will be avoiding the Shaky Cam/Handheld feel by having the camera stabilised. This would remove the time needed to correct the footage later.
Difficult Shot:
Shooting at night is not ideal. With issues from Noise and high ISOs, to needed good lighting to just see ANYTHING. But what was going to be a real problem was that there are no tutorials to help us with this effect. We have to watch the sequence frame by frame to see when things change, how things change, why he changes it there.
We split the project into sections and worked out who would be working on what parts.

I was tasked with creating the Monster rig - having it ready to attach the tentacles that Shaun was going to make, animating it for the pickup, and animating the car being picked up. Phil would handle the car being thrown aside. I would also have a look at simulations for fog. My skills with Maya were not up to scratch, however and I was unable to make a suitable fog effect.
We also looked at locations.


A good spot for the night shot was this area of Ash Road. It is near where Phil lives and he said that at night, the spot would be perfect, as the street lights are far enough away to not be a problem and the trees blocked the lights from the main road behind. Sadly, shortly after choosing this spot, the council had cut the trees down.

Near me, we found this little area. There were no lights, far enough away from the Ringroad... It seemed perfect!
But the area is fenced off, so we couldn't get cars there.

Shaun suggested Danby Forrest. The problem here is that it's in the middle of nowhere and getting to it would be a pain.

Another possible location I found was Roundhay Park. There are plenty of trees in the area and reasonable access to them by road.
In the end, we opted for none of these and found a spot on Headingley Campus, which leads towards the student halls. There are a lot of trees and no street lights.
CREATING THE MONSTER:
Gareth Edwards made his monster's rig using 3Ds Max's CAT system. To be true to the film, we decided that's what we would do, too.
Loading up a SPIDER CAT rig and deleting the pedipalps and some of the legs, then adding to them with extra bones was how I would end up making the beast. Aligning the legs into roughly how the monster should have it's legs was a tricky feat. If they weren't right, the movement would be too lopsided or rigid. Getting the right number of bones in the legs would give you the right bend in the legs for when the monster stoops down to pick up the car, then stand back up. Too many bones and it would stoop too low, too few bones and it would look like it was moving on stilts, not being able to bend right and making for awkward movements. It was trial and error to get the rig right. But with how Shaun had got the tentacles simulated and skinned, it was worth the effort.

The standard 3 bone legs did not give a good enough arc in the movement, something which would severely affect the animation.
I did find, however, that 5 bones would make for a nice arcing movement.
To animate the car being lifted, I would require Shaun's tentacles to be added to the rig, and Phil to have modelled the car. Once these were done, I would match the movement of the car to the movement of the tentacles. The car lift and the tentacles would be rendered separately, as the version that the car was modelled and textured in would not carry across to the previous version which the car was made in. This was a part of our workflow which we had taken into account and were ready for.
Once the car was rendered out in passes, it was ready to be added into the scene along with the tentacles.
SIMULATION:
These were left out, as I was not able to get the fog to react properly. The result was just like thin smoke coming from an emitter. I tried to keyframe the fuel rate in Maya to change the rate that the fog was being created, but in the end, we had to accept defeat. This also was a problem for the dirt hits when the car hits the ground after being picked up by the monster. In the end, we had to resort to a Dirt Charge from Action Essentials. Action Essentials was only to be a last ditch effort, as we wanted to create our elements, ourselves.
When I tried to make the fog and dirt charges, I was using a simulation I had used for another project as a reference as to how to make it.
Explosion Simulation that I made in Maya for the Animation and Simulation module.
I had been able to change the rate the fuel was used, which would stop emitting smoke after a certain amount of time. I could not recreate this with the fog, however.
EDITING:
Shaun, Phil and I each took turns in editing sections of the video. I mainly roto'd out sections to allow the tentacles to pass behind the driver and passenger. I would remove the hard edge of the mask by feathering the edge. This would blend the clips together in a more realistic fashion, allowing the features to effectively bleed into eachother, giving you a slight overlap in colours, assisting in blurring the images. Part of the car landing shot I masked, too. The car rolling into shot would roll in front of the wing mirror, so I masked over it to keep the car outside. I also added Motion Blur to the car as it was picked up. Motion Blur is needed to make elements look realistic. Everything that moves is blurred. It's just how our eyes see things, so if you don't add the Motion Blur, it will stand out really obviously. The down side to adding Motion Blur is that it ups Render times a lot, especially in our scene, where you had multiple objects being blurred, ie, the tentacles and the car.
We used a Gaussian Blur on the car and tentacles for the pulled focus shots and keyframed it so it would match the focus of the footage. We kept a slight blur on the objects because, like with the motion blur, the eye always has some blur to what it sees. By adding the blur to the CG objects, it allows us to keep them fitting in with the scene.
I also added some film grain to the footage at the end, since we had removed grain from the original footage, we could add grain at the end which would include the CG elements.
Performance Capture Final Piece
I managed to get my Performance Capture project completed!
Acted by myself (The final sequence) and Richard Nash. The male character is completely Key Frame animated, using my own actions and the Motion Capture footage as reference.


A collection of photos from the various attempts at getting our footage.
A couple videos James Ruston (http://foreverrendering.wordpress.com/author/foreverrendering/) shot during one of the sessions. MAY REQUIRE A FACEBOOK ACCOUNT
https://www.facebook.com/photo.php?v=10154156269820650
https://www.facebook.com/photo.php?v=10154156417655650
We had a lot of trouble getting our footage, but we finally figured out why... We had been adding a new solver each time we filmed a take. This was bogging down the system and making it crash. Once we fixed that issue, we were able to get our footage no problem. James and I even went as far as shooting some extra takes to work on over the Summer, so be sure to check back for those!
In Motionbuilder, I blended the clips together which would allow model to act out all of the clips in what looks like one go.
The can had a constraint added to it, which would keep it linked to the character's hand for as long as the constraint was active in the timeline.
I found a couple free models online and used them, rather than the Aragor and Maya models. I wanted the characters to look like they were in a dance hall or a club. I was not able to find any suitable scenes to use in Motionbuilder, and time was not on my side to be able to model one.
The keyframe character, I wanted to look quite cocky and "Hey, look at me!" so his walk was very pelvis first, making his weight have to rotate around his hips. This was something I had picked up in the Animator's Survival Kit.
Saturday, 22 February 2014
Muscle Rigging - Week 3
We have been looking at adding muscle rigs to the meshes. It is not necessary to fully rig up the zombie rig with muscles, but I will be looking at adding a couple muscles to it. Especially to the stomach, so I can emphasise the stomach movements.
To practise, we were given a "Muscle Man" rig.
I took looked around online for some muscle diagrams.


To practise, we were given a "Muscle Man" rig.
I took looked around online for some muscle diagrams.
This image is from http://anatomy.askthetrainer.com/ - a training and fitness website.
I chose this image for the simple fact it gives you both front and back diagrams. I also went and printed this out to keep on my wall next to the computer so I can see the muscle system with just the turn of my head! A nice tip for everyone.
The muscles are set up with a series of clicks from the MuscleStrand option, under CAT Objects.
Under the modify tab, there are options for editing the muscle. I have set the muscles to Bones and to allow Squash and Stretch. Squash and Stretch will allow the muscles to flex when they are linked to the CAT rig.
I have named the first muscle Pectoral01, as this will make it easy to keep track of what muscle is what should I need several muscles on the rig. It's a good habit to get in to.
I placed the muscle over where I needed it to be, in this example, over the chest and leading to the arms/shoulders.
By relaxing the muscle with this setting, I can keep the rig inside the mesh and will allow an impressive flex. I then connected the muscle to the ribcage and the upper arm.
I keyframed some animation, the arm lowers and then raises right up, then back to the starting position. This screencap shows the muscle being stretched.
I also added a second muscle to work as the muscle between the shoulder and the neck, the Trapezoid.
When the arm was raised too high, the mesh would crumple, like this. I couldn't correct it with weighting, so I lowered the arm in the animation. This sorted it out.
As I had done with the zombie mesh when skinning, I added the muscles to the bone list, then began to edit their weighting. I used the Paint Weighting tool for this as it is a high poly mesh.
This is a render of the muscle rig.
I will want to go back and alter some of the weighting and maybe even the location of the trap muscle slightly. I would also alter the animation slightly, making it more of a Lateral Raise. This would move the pectoral muscle slightly, and the trap much less (unless his form was off, in which case his trap would be being worked more than his lats. Bro, do you even lift?)
To do this, I would be using workout tip videos, like this one by Matty Fusaro who talks you through the yes and no's of Lateral Raises.
http://www.youtube.com/watch?feature=player_detailpage&v=HJG-gvG2N5E#t=177
I wanted to add the Bicep into the rig and have him flex his muscles in the final render.
Sadly, it destroyed the mesh.
It puts me in the mind of the cartoons, where a weak character flexes and his muscle drops down.
The final render with the weighting corrected and bicep removed.
Zombie Rigging - Torso - Arms - Head
Continuing the rigging of the zombie, I moved onto the torso.

I selected the areas around each of the bones and blocked them out.

The first piece I began cleaning up on the torso was the Belt. This area is a constant width, so I had to keep that in mind with it;s weighting.

The belt is part of the spine bone so it will stay at it's constant width. It only needed a small weight edit.

A closer shot of the belt.
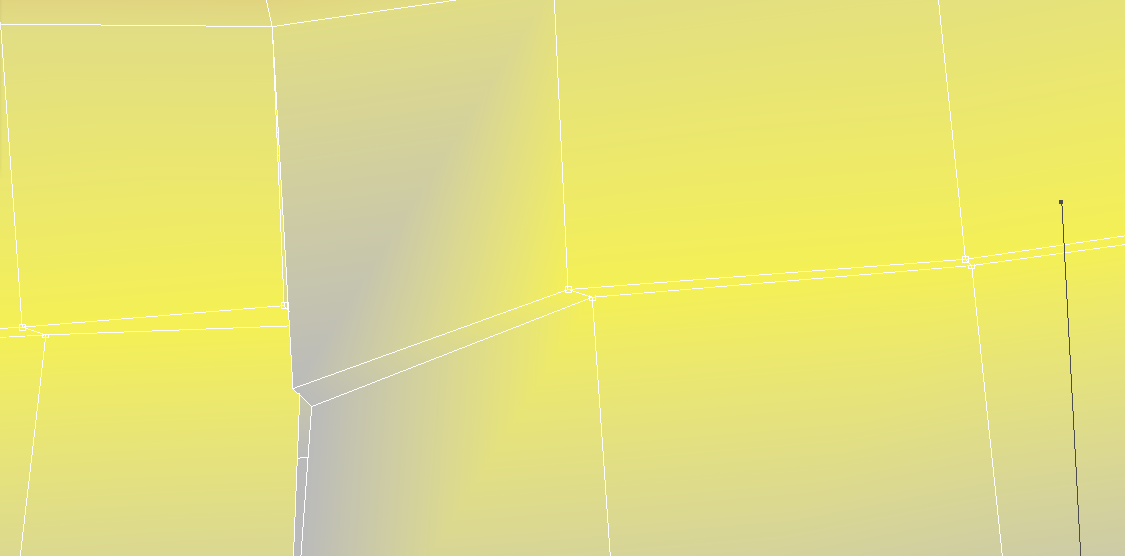
I found a slight error from the welding. It didn't weld it at all. This was a constant thing I had to fix, ensuring that any loops had 30 vertices selected became second nature when working on the torso.
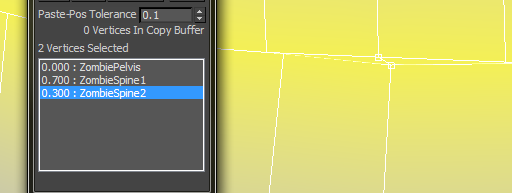
To fix this issue, I just matched the weighting with the rest of the loop.

Blending the torso together finishes off the torso.
The toughest part of this rigging was just the error from the Weld and getting used to the fix I had done.
From here, I moved to the Shoulders, then down the arms.

Weighting areas to the Clavicle then blending them to the shoulders is a little tricky to get right just because of the way the shoulder reacts when moving. Starting with a 10% weighting at the neck/collar is where I kicked off.

Blending down the shoulder takes a certain mindset to know you are getting it right. I think I've touched on this before, where as you are working on the areas, they will look NOTHING like how you are wanting it to look until you are finished and it just clicks into place. Once I got my head around that way of thinking, it became easier to do. This shot is a perfect example of it. The big difference in the weighted section and the parts left to edit can be off putting.

Blending the next loop drops the gap down, then moving further down the shoulder, it clicks into place perfectly!

The basis of the shoulder is weighted. From here I finetune the areas so as to get a smooth transition for the movement.
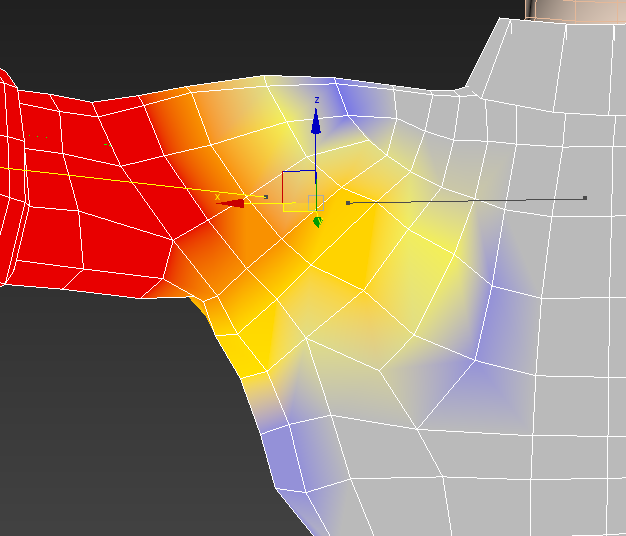
The underarm area was tricky to nail down. I used my own movements to get this section working properly.
This is the reference footage.
I then moved to the arms.

As always, I block out the areas to start. It makes blending the areas that much easier.

To get the elbow crush correct, I had to trial and error my way through it and to make it blend convincingly. This was the toughest area of the arm, I found.

Blending the forearm includes part of the sleeve. This is mainly for extreme arm twists, it will drag the sleeve cuff, slightly.

The bottom part of the forearm, I blended the upper forearm and the wrist together. The underside of the wrist has a slightly stronger influence.
I moved onto the hands. This was a fairly short process.

The hand needed blocking out, removing the influence on the fingers. These will be sorted out later.

Also, the crushing on the wrist needs tweaked right away.

Using the opposite poses to where I want to edit, I select the vertices and begin to blend into a smooth transition.

The top of the hands.

For some reason, the hand had a couple vertices that would not change. I had to find the bone that was connected to the vertices and select a weight of zero. I don't know why it wouldn't allow me to do it direct to the new bone selection.
I worked on the fingers next.

The fingers needed a lot of work to get right. From the start, the fingers would splay out. This portion infuriated me to no end.

The fingers needed a lot of blending to make them look right. I would start from the tips and work down to the hand. The thumb needed so much work, as the third portion of the thumb is part of the hand itself. Getting this right made the hand really come together.
Here is a render of how it came out.
I then used the Skinwrap tool to take the symmetrical mesh and place the weighting on the original mesh.

After unhiding the original mesh, I applied a Skin Wrap modifier to it. These were the settings I used.

Ensure the proxy mesh and the original mesh are in the same position. I tried like this after scrubbing through the animation to check it was all fine and it matched the animation like this and looked very strange.

The tutorial said you could remove the proxy mesh at this point, but when I did, the animation would not carry over to the original mesh. It was a simple case of backing up.
Next was the head.

I set the eyes and mouth to be part of the head via the parenting option.

It keeps them as part of the rig in this way.

Setting the head up to follow the head is the same as registering the bones, like I had done with the rest of the body.

When scrubbing the timeline to make sure everything was connected properly, I came across this little error.
It was a simple case of adding an extra bone.

To the bone, I gave it a weighting value of 100%. This would keep the neckline in place.

I would then blend the neck to give a smooth movement.
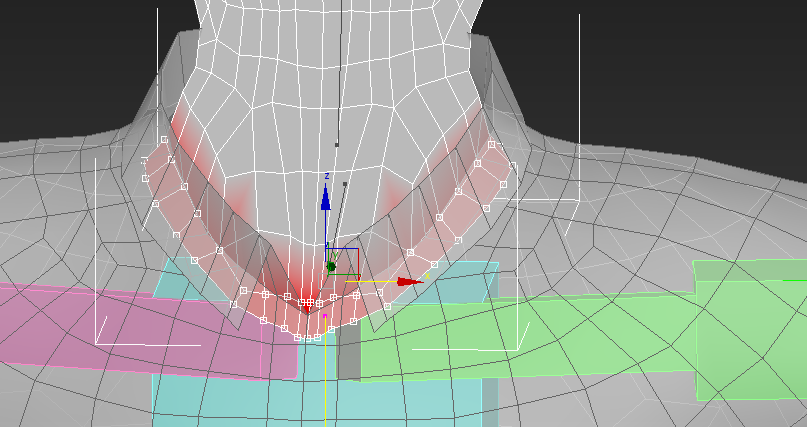
I had to play with the weighting a little more to stop the neck from breaching the torso when it moved.
This is a render of how the head movement came out.
My blog would not let me upload my reference footage, so I put it on Youtube. Here is the link.
http://youtu.be/ZbbjnEUPlw8
http://youtu.be/ZbbjnEUPlw8
Subscribe to:
Posts (Atom)