WOO WOO WOO! YOU KNOW IT!

Production Blog of an Animation and Special Effects Student
Showing posts with label maya. Show all posts
Showing posts with label maya. Show all posts
Thursday, 12 May 2016

Tuesday, 10 May 2016
One for Long Island
Hey all! Been doing some more 3D this morning. I started with a bit of reference footage of throwing up the LIs. Using the footage, I came up with this:
Note: This is a Playblast render, not representative of the final render.
So from here, I'll be adding some more motion, as I've just done the key poses. Then I'll be cleaning it all up.
After this one is finished, I'm thinking possibly a Broski Boot, then a Rough Ryder (separate clips). Give the "Beefy" model a KO vest, perhaps? Then, if I'm feeling brave, finish off with a Pop-Up Powerbomb?
This is all future, though. Let's go a step at a time.
WOO WOO WOO! YOU KNOW IT!
Saturday, 23 May 2015
Advanced Animation and VFX Week 14-2
I'm preparing for my hand in tomorrow, so I will review my Animation piece with what feedback I gathered online. Also, I will showcase my Showreel.
 I am friends with the band members on Facebook, where I messaged the band's singer, who wrote the song. Truls Marius Dale (Tiam Dee).
When I had asked one of my lecturers how I could show I had got permission to use a track from a band, he had told me so long as it was in writing, it was fine! Flare are an excellent group of musicians from Bergen, Norway. Thanks to Truls Marius Dale, I was able to have an upbeat, happy rock/pop track to my animation. I was able to have some of the animation hit beats well which really emphasises the animation, I feel, as do those who have seen my reel. Former animation student Alex Wright was not only impressed with how the music complimented my animation style, but also the quality of the animation shown and the range of skills I have shown.

DIRECT LINK: https://youtu.be/K29MWHOIn9w
My showreel features music from Norwegian band Flare, a band I became friends with a couple years ago. I'm actually featured in their second album under the Thanks section! They're a band I got to know while working as a volunteer on my hometown's radio station, where I was a regular broadcaster which featured bands from across the world who weren't household names and who I had become friends with through Myspace (yes, it was that long ago)
When I had asked one of my lecturers how I could show I had got permission to use a track from a band, he had told me so long as it was in writing, it was fine! Flare are an excellent group of musicians from Bergen, Norway. Thanks to Truls Marius Dale, I was able to have an upbeat, happy rock/pop track to my animation. I was able to have some of the animation hit beats well which really emphasises the animation, I feel, as do those who have seen my reel. Former animation student Alex Wright was not only impressed with how the music complimented my animation style, but also the quality of the animation shown and the range of skills I have shown.
DIRECT LINK: https://youtu.be/q3D9_aRvZ2Y
Reviews of the Wrestling piece were very positive! I mainly got feedback from the website Newgrounds.
Newgrounds gives a visual rating on the page out of 5 stars. The piece has been up since Monday 18th May and has scored 3.68/5
Animator Rob Yulfo (Freelance animator who has been featured on Comedy Central's Trip Tank) said of the piece that it reminds him of Rockem Sockem Robots, which is something I've heard a couple times since selecting those models. Of the animation, he told me that it is of very good quality. As someone who has worked with Maya in the past, he knows how tempting it is to have the camera floating through the scene, which is something I actively set out to avoid since the beginning. My choices of camera angles played the piece well, showing the Face Character being on the back foot until he manages to reverse the Curb Stomp, where the camera is a low angle for the Heel character, emphasising the danger for him.
Simon Jobson, who has experience with animation for web design, commented on the fluidity of the secondary movement and the emphasis before moves are performed. He also followed up with a quote of South Park, "That's not real Wrastling!"
Newgrounds user Mighty Dein complimented the careful attention to the poses within the piece which created an excellent animation for character interaction.
Another user Maddude13pt2 wished I had actually made a full 3 minute short of the fight, suggesting that in the future, maybe think of doing a collaboration with other animators to lighten the load of animating it all.
The reviews were ranged between 3-5 stars, with the overall rating being based off of the views where the users rated (not reviewed).
Monday, 18 May 2015
Advanced Animation and VFX Week 14-1
FINAL PIECE
Breakdown 01
DIRECT LINK: https://youtu.be/q3D9_aRvZ2Y
Breakdown 01
DIRECT LINK: https://youtu.be/w-8AFuVjPLw
Breakdown 02
DIRECT LINK: https://youtu.be/bIC00dCwMKc
I broke the breakdown into 2 parts as they look at solo animation and interaction animation in their own sections.
Sunday, 17 May 2015
Advanced Animation and VFX 13-2
Animation and Breakdowns are completed! I'm going to be uploading them tomorrow for feedback and what not from the general public rather than lecturers and peers.
The animation Breakdowns that I looked at to see how they are arranged:
https://youtu.be/2z_k2z5m6H0 - Bobby Pontillas, Frozen
https://youtu.be/l9uaH6bXI4k - Patrick Giusiano, Epic
https://youtu.be/l-S7wQx_hvs - Jamaal Bradley, Tangled
https://youtu.be/szJ9Ohi2FNo - Daniel Peixe, Frozen (Sven)
I found these breakdowns to be the best examples of how to lay out my breakdowns, from 2D planning to the final render.
The animation Breakdowns that I looked at to see how they are arranged:
https://youtu.be/2z_k2z5m6H0 - Bobby Pontillas, Frozen
https://youtu.be/l9uaH6bXI4k - Patrick Giusiano, Epic
https://youtu.be/l-S7wQx_hvs - Jamaal Bradley, Tangled
https://youtu.be/szJ9Ohi2FNo - Daniel Peixe, Frozen (Sven)
I found these breakdowns to be the best examples of how to lay out my breakdowns, from 2D planning to the final render.
Friday, 15 May 2015
Advanced Animation and VFX Week 13-1
I've been working on my Reel this week, looking at what pieces I would like to use in it, finding music I would like to have over it, things like that.
Sunday, 10 May 2015
Advanced Animation and VFX Week 12-2
I set the textures and renderer for Linear Workflow and got After Effects ready for Linear, too. When rendering an image using the .exr file format, you must change your framebuffer type to 32-bit float or 16-bit half float. Otherwise, your image will be clamped to [0, 1]. I had my renders at 32 bit Float.
I've mostly been recovering from the Showcase! My legs still hurt...
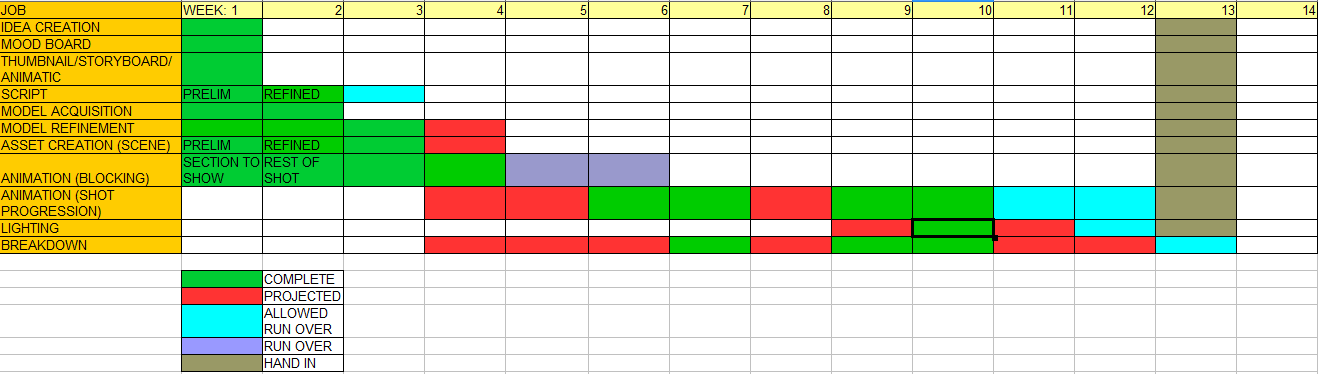
 The hand in has actually changed from where it says on this Gannt chart. I also fixed the Face character's hand at the end of the piece.
I've mostly been recovering from the Showcase! My legs still hurt...

Wednesday, 6 May 2015
Advanced Animation and VFX Week 12-1
I was part of the End of year Showcase yesterday! So some of Sunday and all of Monday was spent getting my video ready for that! It was a great opportunity to get my work reviewed for both Production Project and this piece as I had a section of mostly finished work in my video. It wasn't set for Linear Workflow, though.
Sunday, 3 May 2015
Advanced Animation and VFX Week 11-2
Working with a Linear Workflow? I will be! I had got some feedback from an animator friend of mine asking if I had been working with a Linear Workflow for my Production Project and he told me to look it up for future projects, so I've been looking that up.
https://youtu.be/pf5kDcehYXA This video explains it quite well, I found. It even helps you set up the Maya scene for Linear Workflow!
 Working towards the last stretch! All I have to do now is a tiny bit clean up and get the scene ready for Linear Workflow! From there, it's the breakdown!
https://youtu.be/pf5kDcehYXA This video explains it quite well, I found. It even helps you set up the Maya scene for Linear Workflow!

Wednesday, 29 April 2015
Advanced Animation and VFX Week 11-1
I've changed my script up a bit now, because with what actually shows on screen, I can really get into the commentator character! I've been thinking of going for a classic WWF commentator voice, like along the lines of Good Old JR, Jim Ross.
Sunday, 26 April 2015
Advanced Animation and VFX Week 10-2
DIRECT LINK: https://youtu.be/L2PraOcs-Ao
Lighting completed with cameras and clean up.I need to correct one of the lights which is shining very harsh on the character.
Wednesday, 22 April 2015
Advanced Animation and VFX Week 10-1
I've been looking at lighting in the scene. As the characters are moving around, I don't want the lights to be moving around, as this could cause some very strange lighting effects, which I would like to avoid.
One of the best resources in easy to understand cinematography in my opinion is Film Riot on Youtube. I have been using their tips and tricks for a couple years now and I love how they break everything down to be very understandable for the average viewer.
https://youtu.be/fUsTpUzOhFY I used this Film Riot video to learn tips on how to light moving characters
 I sketched out the placements in the scene. Using different pens, I would draw where the characters were, where the camera would be and this would give me an idea of where I could place lights to give the best coverage, as too many lights would slow down rendering if they aren't needed. If characters are in the same area twice, I will only need to use 3 lights to give the best lighting coverage, as I use 3 point lighting in my scenes, as I find they give the best results. I look at my scenes as a stage and employ techniques used in theatre to get the best quality of image. Theatre often uses three-point lighting to excellent effect, Where it differs from theatre is that I can easily have the lights move through the scene with the camera, whereas in theatre, the audience are effectively the camera.
The three lights are referred to as Back light (obviously behind the subject), this separates them from the background when used in conjunction with the Key light which shines directly on the subject and the Fill light, which is placed relative to the Key light and shone from a lower angle.
One of the best resources in easy to understand cinematography in my opinion is Film Riot on Youtube. I have been using their tips and tricks for a couple years now and I love how they break everything down to be very understandable for the average viewer.
https://youtu.be/fUsTpUzOhFY I used this Film Riot video to learn tips on how to light moving characters

The three lights are referred to as Back light (obviously behind the subject), this separates them from the background when used in conjunction with the Key light which shines directly on the subject and the Fill light, which is placed relative to the Key light and shone from a lower angle.
Sunday, 19 April 2015
L6 Production Project - Alien Assault
NOTE:
As embedded videos do not save in Archived Pages, I have provided direct links to each video
The final piece for the Production Project.


The Storyboard for the sequence
I ended up dropping sections of this storyboard (Page 3- Panel 3 onwards), as I simply did not have time to get everything together. What I do have for the final piece I feel is pretty accurate to the storyboard.
Getting this project finished was... a nightmare for me. Drowning in stress and errors was the most terrifying experience I've had. My presentation for the piece could not have gone worse, really. I was exhausted and defeated. The feedback I was given, however was priceless. After taking that day to just de-stress and get my head back together, I was ready to get my nose back to the grindstone. I redid the opening sequence partially to remove the bizarre camera moves and lip sync, plus fixing the "zombie eyes" that plagued the initial video.
Night of the Living Headache - Part of my presentation video with errors.
Whilst presenting, my computer was rendering a scene out for the final product. When checking that batch render, I discovered yet more problems which were not in the frame render I did. The aliens seemed to be black, no texture on them, just floating eyes. Upon further tests, it turned out they were rendering as alpha channels. (See below)


How the alien should have looked
I ended up re rendering this scene (plus another I had rendered by a friend, as it had the same problem). This time, however, I rendered as .png (and at HD720 to quicken the render process. I had no time to waste.)

Problem solved!
Thankfully, this fixed the "Stealth Alien" problem, as I came to call it. I also fixed some camera work in this scene.

Alien Shooting

After Effects layers for alien shooting
The alien shooting sequence comes from a test I had done through the Summer from Video Copilot.
What I had made following Video Copilot's tutorial
After I had made that, I knew that I wanted to do more with it. It was a fun effect and relatively simple to make (and let's be fair, after all is done with this project, ANYTHING is simple!). As the aliens in my piece were not using conventional weapons, the Sci-Fi gunshot was a clear option. Making this effect used VC's Shockwave assets and for this project, I added a Sparks asset from Action Essentials 2 (also from VC) and added a Polar Coordinates effect so I could have the sparks move in a circle, rather than flat. The weapon fires several elements, from the directional light from the muzzle flash, the shockwave flash and the shockwave projectile which is launched towards the camera, then the sparks which follow. In the screenshot of the After Effects layers, the White Solids are the muzzle flashes which are single frames of a flash, starting with just the barrel being filled with light to two flashes which are slightly altered and give a green flash which fills the screen.
This clip is a 1st person shot of the alien's round being fired.
I used this in my presentation to show an effect I was going to have in the final piece, but it was eventually dropped.
Unused Scene 01
So I dropped this scene, as I would have had to render some extra frames at the end. Simply freezing the last frame would keep the soldier in shot and would look off. I was also just not impressed with the effect overall. It was confusing and just didn't work. The explosion and sound effect are both from Action Essentials 2

Part of the explosion had to be masked out, so it didn't show over the soldier, who was in front of the blast.
Unused Scene 02
I dropped this scene for two reasons, the scene previous was dropped (the 1st person shot where you see the soldier sliding into cover) and the scene following it was not rendered due to time constraints. The following scene was to show the alien being shot off of the car. The above clip does not have sound.
I had even researched the recoil of the weapon (P90) and the movement in the scene features that.
I relied a lot on limited animation and being clever with camera placement. If it wasn't in shot, it doesn't get moved, simple as that. This saved a lot of time on the running of the character. You don't see his feet or legs, so I didn't have to move them. This isn't a new idea, however. It's one of the greatest time saving techniques going. That and 2's. Or 3's if you're making anime.
Live action reference footage was a godsend, too. A lot of what I have will come in handy for the future, and I'd like to think I'd redo this project one day (just for fun! I don't plan on resitting this!) Possibly even do it in 2D. As I do love 2D!
RENDERING!
Rendering was the bane of my life! I was rendering at 1080 with a decent quality, so I could give a good looking product. However, render times were MASSIVE. The Presentation video took over 30 hours to render. This alone destroyed my plans. I had begun rendering later than I wanted, as I was encountering issues with animation and lip sync. I resorted to rendering at HD 720 to speed up render times, but I also went back to the main scene which I was referencing in Maya. I cut the scene up to create more of a film set. This massively reduced the data Maya was working with and helped with rendering even further.
I had made a huge mistake with the modelling. I spent a lot of time making a beautiful scene, where I was not really needing such detail. My thinking of it was Jack of all trade. Be a generalist, I can model environments, I can animate characters and lip sync. However, with all of these areas, I was backing myself into a corner when problems arose. As seen in earlier posts, my scene began self destructing which required troubleshooting. But on the flip side, I did learn how to troubleshoot effectively!

Martin Bell of Yes, Commissioner! helping with Troubleshooting
When compositing my footage, I had to fix the Gamma settings on the OpenEXR files. After Effects was applying it's own Gamma to the files, which was having them far too bright and destroyed the colours on the weapons, especially the P90. The magazine on the top of the weapon had it's colours distorted so much. Gamma correction fixed the issues.
Hindsight is 20-20. When I look back on this project, I see so many things that I would have done differently. The main thing is changing my entire idea. Instead of an action sequence with speech, just focussing on speech!
If it needs a background, just do a simple one! Focus on the facial animation!
Creating sounds! Sound effects in the sequence range from a "Pulse Grenade" for the Alien gun, war background noise which has it's decibel level dropped, my voice, me making gutteral, throat noises for the alien shouting and just setting the microphone in front of my cat Tippy while stroking him for a purring which became the noise of the aliens. When the alien jumps onto the front of the Humvee, I took the sound of someone sliding over a car bonnet and matched it to the impact of the feet and hands of the alien hitting the vehicle. As the alien is a skinny creature, I assumed the creature is light, so the sound is very subdued, but without the sound, you can tell it's missing.
I have learned so much in the course of this project, from modelling techniques, skinning and rigging in Maya, creating custom attributes for the skeleton (like the hand controls where I can control the fingers from sliders) to taking the Morph Target process from my dissertation further and having the blendshapes of just the head being applied to a whole model. What I am taking away from this most, though, is "Work Smarter, Not Harder", "Keep It Simple, Stupid". Don't be a scope creep, meaning, if I have to say to myself, it's a lot, but I can do it, that should be throwing up red flags so go back to the drawing board. And to trust in my ability. For a while, it felt like I was never going to get it done, but here I am! Yeah, it's not how I wanted it to be, but that goes into my previous point.
Advanced Animation and VFX Week 9-2
Second section cleaned up, too!
Again, I'll go back through these and clean them up further
 Back on track, now. Production Project, for the most part, is over. It's just the review for it, which is fine. My time can really be spent on this project, now. I have a lot of catching up to do!
Status: It's looking up!
Again, I'll go back through these and clean them up further
DIRECT LINK: https://youtu.be/QPvKE4fFEXk

Status: It's looking up!
Wednesday, 15 April 2015
Advanced Animation and VFX Week 9-1
I've done all the clean up for the first section! I still want to go back through it, though for another Clean Up.
But second clean up will be a shorter process.
But second clean up will be a shorter process.
DIRECT LINK: https://youtu.be/9MTVhRl_ZNI
Saturday, 4 April 2015
BONUS WEEK! Advanced Animation and VFX - Easter Holiday Edition
Well, I wanted to get a good week of working on this project done, but it's kind of just fell to only doing a couple hours on it. Yep, it's that bad for the other project. But it's getting there! I'm actually looking a bit more hopeful for this one as a result! I did a little more Clean up and with hand in being next week for Production Project, the rest of my time will be a solid effort!
I've also been looking at the camera techniques used in action sequences.
As wrestling is filmed live, the camera operators are getting shots as and when they can. In film, the cameras are strategically placed to give the audience the best shots possible. The same is with the lighting. I was originally going to mimic the lighting set up in the WWE, but this doesn't give the best lighting effects, especially when digitally, I can do ANYTHING with lighting.
Fight scenes in films will be an invaluable source of camera reference. Wide angle shots and in close tight shots for certain moments, like the pin. A couple great examples follow
https://www.youtube.com/watch?v=mjx-02XWuzk
Hulkbuster scene - Avengers: Age of Ultron
https://www.youtube.com/watch?v=x0p7TS7I728
Narrator vs Angel Face - Fight Club
https://www.youtube.com/watch?v=vV3i2SeXhSM
The Ram Vs Ayatolah - The Wrestler
https://www.youtube.com/watch?v=Z1PCtIaM_GQ
Jackie Chan's fighting and comedy - EXCELLENT
https://www.youtube.com/watch?v=kXFBggMSgo8
Jean Claude Van Damme - Frankie Dux vs Chong Li final fight - Bloodsport
Jackie Chan brings up an excellent point about filming fighting scenes. The camera changes on the hit, as the actors cannot fight, whereas he can, so the camera doesn't switch. In animation, there's no need for stunt doubles or anything like that. Because of this, I can keep the camera in a good position and show the character getting smacked around!
I've also been looking at the camera techniques used in action sequences.
As wrestling is filmed live, the camera operators are getting shots as and when they can. In film, the cameras are strategically placed to give the audience the best shots possible. The same is with the lighting. I was originally going to mimic the lighting set up in the WWE, but this doesn't give the best lighting effects, especially when digitally, I can do ANYTHING with lighting.
Fight scenes in films will be an invaluable source of camera reference. Wide angle shots and in close tight shots for certain moments, like the pin. A couple great examples follow
https://www.youtube.com/watch?v=mjx-02XWuzk
Hulkbuster scene - Avengers: Age of Ultron
https://www.youtube.com/watch?v=x0p7TS7I728
Narrator vs Angel Face - Fight Club
https://www.youtube.com/watch?v=vV3i2SeXhSM
The Ram Vs Ayatolah - The Wrestler
https://www.youtube.com/watch?v=Z1PCtIaM_GQ
Jackie Chan's fighting and comedy - EXCELLENT
https://www.youtube.com/watch?v=kXFBggMSgo8
Jean Claude Van Damme - Frankie Dux vs Chong Li final fight - Bloodsport
Jackie Chan brings up an excellent point about filming fighting scenes. The camera changes on the hit, as the actors cannot fight, whereas he can, so the camera doesn't switch. In animation, there's no need for stunt doubles or anything like that. Because of this, I can keep the camera in a good position and show the character getting smacked around!
Sunday, 29 March 2015
Advanced Animation and VFX Week 8-2
Kill me now.
If it can go wrong, it will go wrong. At least I have two weeks to focus solely on work. I've managed to fix the issue with my Production Project piece, but it's taken time away from this project again.
No animation done for it just yet.
 Status: I want to give up.
If it can go wrong, it will go wrong. At least I have two weeks to focus solely on work. I've managed to fix the issue with my Production Project piece, but it's taken time away from this project again.
No animation done for it just yet.

Wednesday, 25 March 2015
Advanced Animation and VFX Week 8-1
I've received a giant punch in the face from Production Project this week, so I've not had a whole lot of time to work on it just yet, moving from Stephen Brooks' feed back. I have, however been looking further into the 180 Rule. I just can't bring myself to open Maya... At least it's nearly Easter Break...
Monday, 23 March 2015
Sunday, 22 March 2015
Advanced Animation and VFX Week 7
No Update so far, as Production Project has put me into hell... So I'm now another week behind. I have begun clean up, and cameras, but a friend of mine said he wants to have a work with me tomorrow with regards to my storyboards, so I'll update this post with that.
UPDATE: 7-2 (though, I guess technically Week 8...) 2Feedback from animator Stephen Brooks of Rubber Onion Animation on my Storyboard pointed out some slight mistakes that I really should have noticed when I made it, but with good reason for making them! As I was using reference footage from a live event, cameras are used as and when they can get a good shot, they don't follow the standard rules for cinematography, like the 180 Line rule, which I crossed.
Brooks told me in a Skype call that from my Storyboard, I should flip panels 1 and 2 on Page 1. This is because usually, the bad guy (heel) is on the right of the screen, moving left. The good guy, left moving right. When crossing the 180 Line, you need to show this in camera, so from panel 5, show the Heel running to the left. Panel 6, have the Heel character slightly left of middle, moving right, with the face in the middle. For the slow motion, think Zack Snyder. Starts real time, goes slow motion as the character comes into frame. For the final sequence, think of using a different Pin. Something staged differently that keeps the positioning of the characters, good left, bad right. A suggestion was either the face throws the character up in the air, letting him drop (a la Mark Henry) or he just dumps the Heel and goes for the pin, having the Heel's head in the centre of frame, body to the right, then the Face, when pinning, have his head middle and his body to the left.

So, changing my storyboard would create an animatic like this
 Breakdown has begun progress, though I guess I could have counted last week as starting it, too, since the block ins will count as part of the breakdown? A little bit of clean up has begun.
Status: Slight slope downwards...
UPDATE: 7-2 (though, I guess technically Week 8...) 2Feedback from animator Stephen Brooks of Rubber Onion Animation on my Storyboard pointed out some slight mistakes that I really should have noticed when I made it, but with good reason for making them! As I was using reference footage from a live event, cameras are used as and when they can get a good shot, they don't follow the standard rules for cinematography, like the 180 Line rule, which I crossed.
Brooks told me in a Skype call that from my Storyboard, I should flip panels 1 and 2 on Page 1. This is because usually, the bad guy (heel) is on the right of the screen, moving left. The good guy, left moving right. When crossing the 180 Line, you need to show this in camera, so from panel 5, show the Heel running to the left. Panel 6, have the Heel character slightly left of middle, moving right, with the face in the middle. For the slow motion, think Zack Snyder. Starts real time, goes slow motion as the character comes into frame. For the final sequence, think of using a different Pin. Something staged differently that keeps the positioning of the characters, good left, bad right. A suggestion was either the face throws the character up in the air, letting him drop (a la Mark Henry) or he just dumps the Heel and goes for the pin, having the Heel's head in the centre of frame, body to the right, then the Face, when pinning, have his head middle and his body to the left.
Before the Skype call, he messaged me in in a Facebook PM. It's a continuation of what I had posted for review, which he explained further in the call.
So, changing my storyboard would create an animatic like this

Status: Slight slope downwards...
Subscribe to:
Posts (Atom)