http://eat3d.com/free/mocap_cleanup
Eat3d have a tutorial that I will be looking at for the Performance Capture module.
I will update this post as I find more.

Production Blog of an Animation and Special Effects Student
Thursday, 13 February 2014

Friday, 7 February 2014
Skeleton to CAT Rig

If I match the amount of bones on the CAT rig to around that of it's human counterpart, I should be able to recreate a very smooth arch in the back.
The picture I have attached here is a composite of the CAT and a skeleton. The RIG is slightly off, as I didn't make this RIG for the skeleton. It is the one I used in the Spiderman test. Something to note with Superheroes design is that they are often made much taller that "regular" humans. Their limbs are often slightly elongated, or in some circumstances, reduced.
Thursday, 6 February 2014
L5 - Digital Visual Effects - Scene ideas.
This project involves working as a team to recreate the VFX from a scene in a film.
The group is;
Phil Baggot - Phil's Blog
Shaun Fontaine - Shaun's Blog
Chris McEwan - That's me!
We are all looking at scenes which we'd like to make, then pooling the ideas and selecting one.
Tron Legacy - Recognizer Scene - 0 to 40 seconds.
http://www.youtube.com/watch?v=ub4tJAJCpo4
There would be a lot of 3D Modelling involved with this scene. The buildings could be done through either Matte Painting or adding 3D modelling elements to video footage.
There would be some Blue Screen work, possibly.
Scott Pilgrim Vs The World - Todd the Vegan scene - 2:08 to 2:34, then 2:43 to 3:29
http://www.youtube.com/watch?v=nUbgQLGKXdM
Large clips and very likely insanely difficult to do, but would pretty damn cool.
There would be a small bit of blue screen work in the first clip, when Todd is hovering in the hole in the wall.
The hair would have to be simulated, which could be done in 3Ds Max. The green lasers and the de-veganise ray would be done in either AE or Nuke, as would Todd's glowing eyes.
UFO (2012) - Ship reveal scene - 1:07 to 1:14
http://www.youtube.com/watch?v=gU6XUD8tEOc
This is just the trailer, but I have the actual film (regretfully, but at the same time, not!)
The ship would be a 3D model and a shot of Leeds would be used as a clean plate.
Digital Doubles would be used for the crowds further down the street. This wouldn't really be an issue as they are out of focus, so detail isn't major. They could be animated in either Max or Motionbuilder.
Plus, this guy.
http://www.youtube.com/watch?v=gU6XUD8tEOc#t=127
Shaun of the Dead - She's So Drunk - 1:20 to 2:07
http://www.youtube.com/watch?v=PAyF7zmJXjA#t=80
The DVD extras show you how this effect was done. The pole is digital and the hole through the zombie is made through multiple layers in post.
The group is;
Phil Baggot - Phil's Blog
Shaun Fontaine - Shaun's Blog
Chris McEwan - That's me!
We are all looking at scenes which we'd like to make, then pooling the ideas and selecting one.
Tron Legacy - Recognizer Scene - 0 to 40 seconds.
http://www.youtube.com/watch?v=ub4tJAJCpo4
There would be a lot of 3D Modelling involved with this scene. The buildings could be done through either Matte Painting or adding 3D modelling elements to video footage.
There would be some Blue Screen work, possibly.
Scott Pilgrim Vs The World - Todd the Vegan scene - 2:08 to 2:34, then 2:43 to 3:29
http://www.youtube.com/watch?v=nUbgQLGKXdM
Large clips and very likely insanely difficult to do, but would pretty damn cool.
There would be a small bit of blue screen work in the first clip, when Todd is hovering in the hole in the wall.
The hair would have to be simulated, which could be done in 3Ds Max. The green lasers and the de-veganise ray would be done in either AE or Nuke, as would Todd's glowing eyes.
UFO (2012) - Ship reveal scene - 1:07 to 1:14
http://www.youtube.com/watch?v=gU6XUD8tEOc
This is just the trailer, but I have the actual film (regretfully, but at the same time, not!)
The ship would be a 3D model and a shot of Leeds would be used as a clean plate.
Digital Doubles would be used for the crowds further down the street. This wouldn't really be an issue as they are out of focus, so detail isn't major. They could be animated in either Max or Motionbuilder.
Plus, this guy.
http://www.youtube.com/watch?v=gU6XUD8tEOc#t=127
Shaun of the Dead - She's So Drunk - 1:20 to 2:07
http://www.youtube.com/watch?v=PAyF7zmJXjA#t=80
The DVD extras show you how this effect was done. The pole is digital and the hole through the zombie is made through multiple layers in post.
Tuesday, 4 February 2014
Rigging a CAT rig
As I will be using 3Ds Max for animating the character, I went to Youtube, then to the 3D Studio channel. They have a whole heap of tutorials in their library. I will be using THIS video to help me with my Rigging.
One change I will be making is by adding an extra "bone" to the forearm. This was a suggestion by my animation tutor. It stops the entire forearm from twisting when you rotate the wrist. Try rotating your wrist. See how very little of the forearm near the elbow twists? You could even argue that it is simply a muscle bulge making that area move. It's because by twisting your wrist, your Ulna and Radius are moving in your arm, along with the Carpus (wrist).
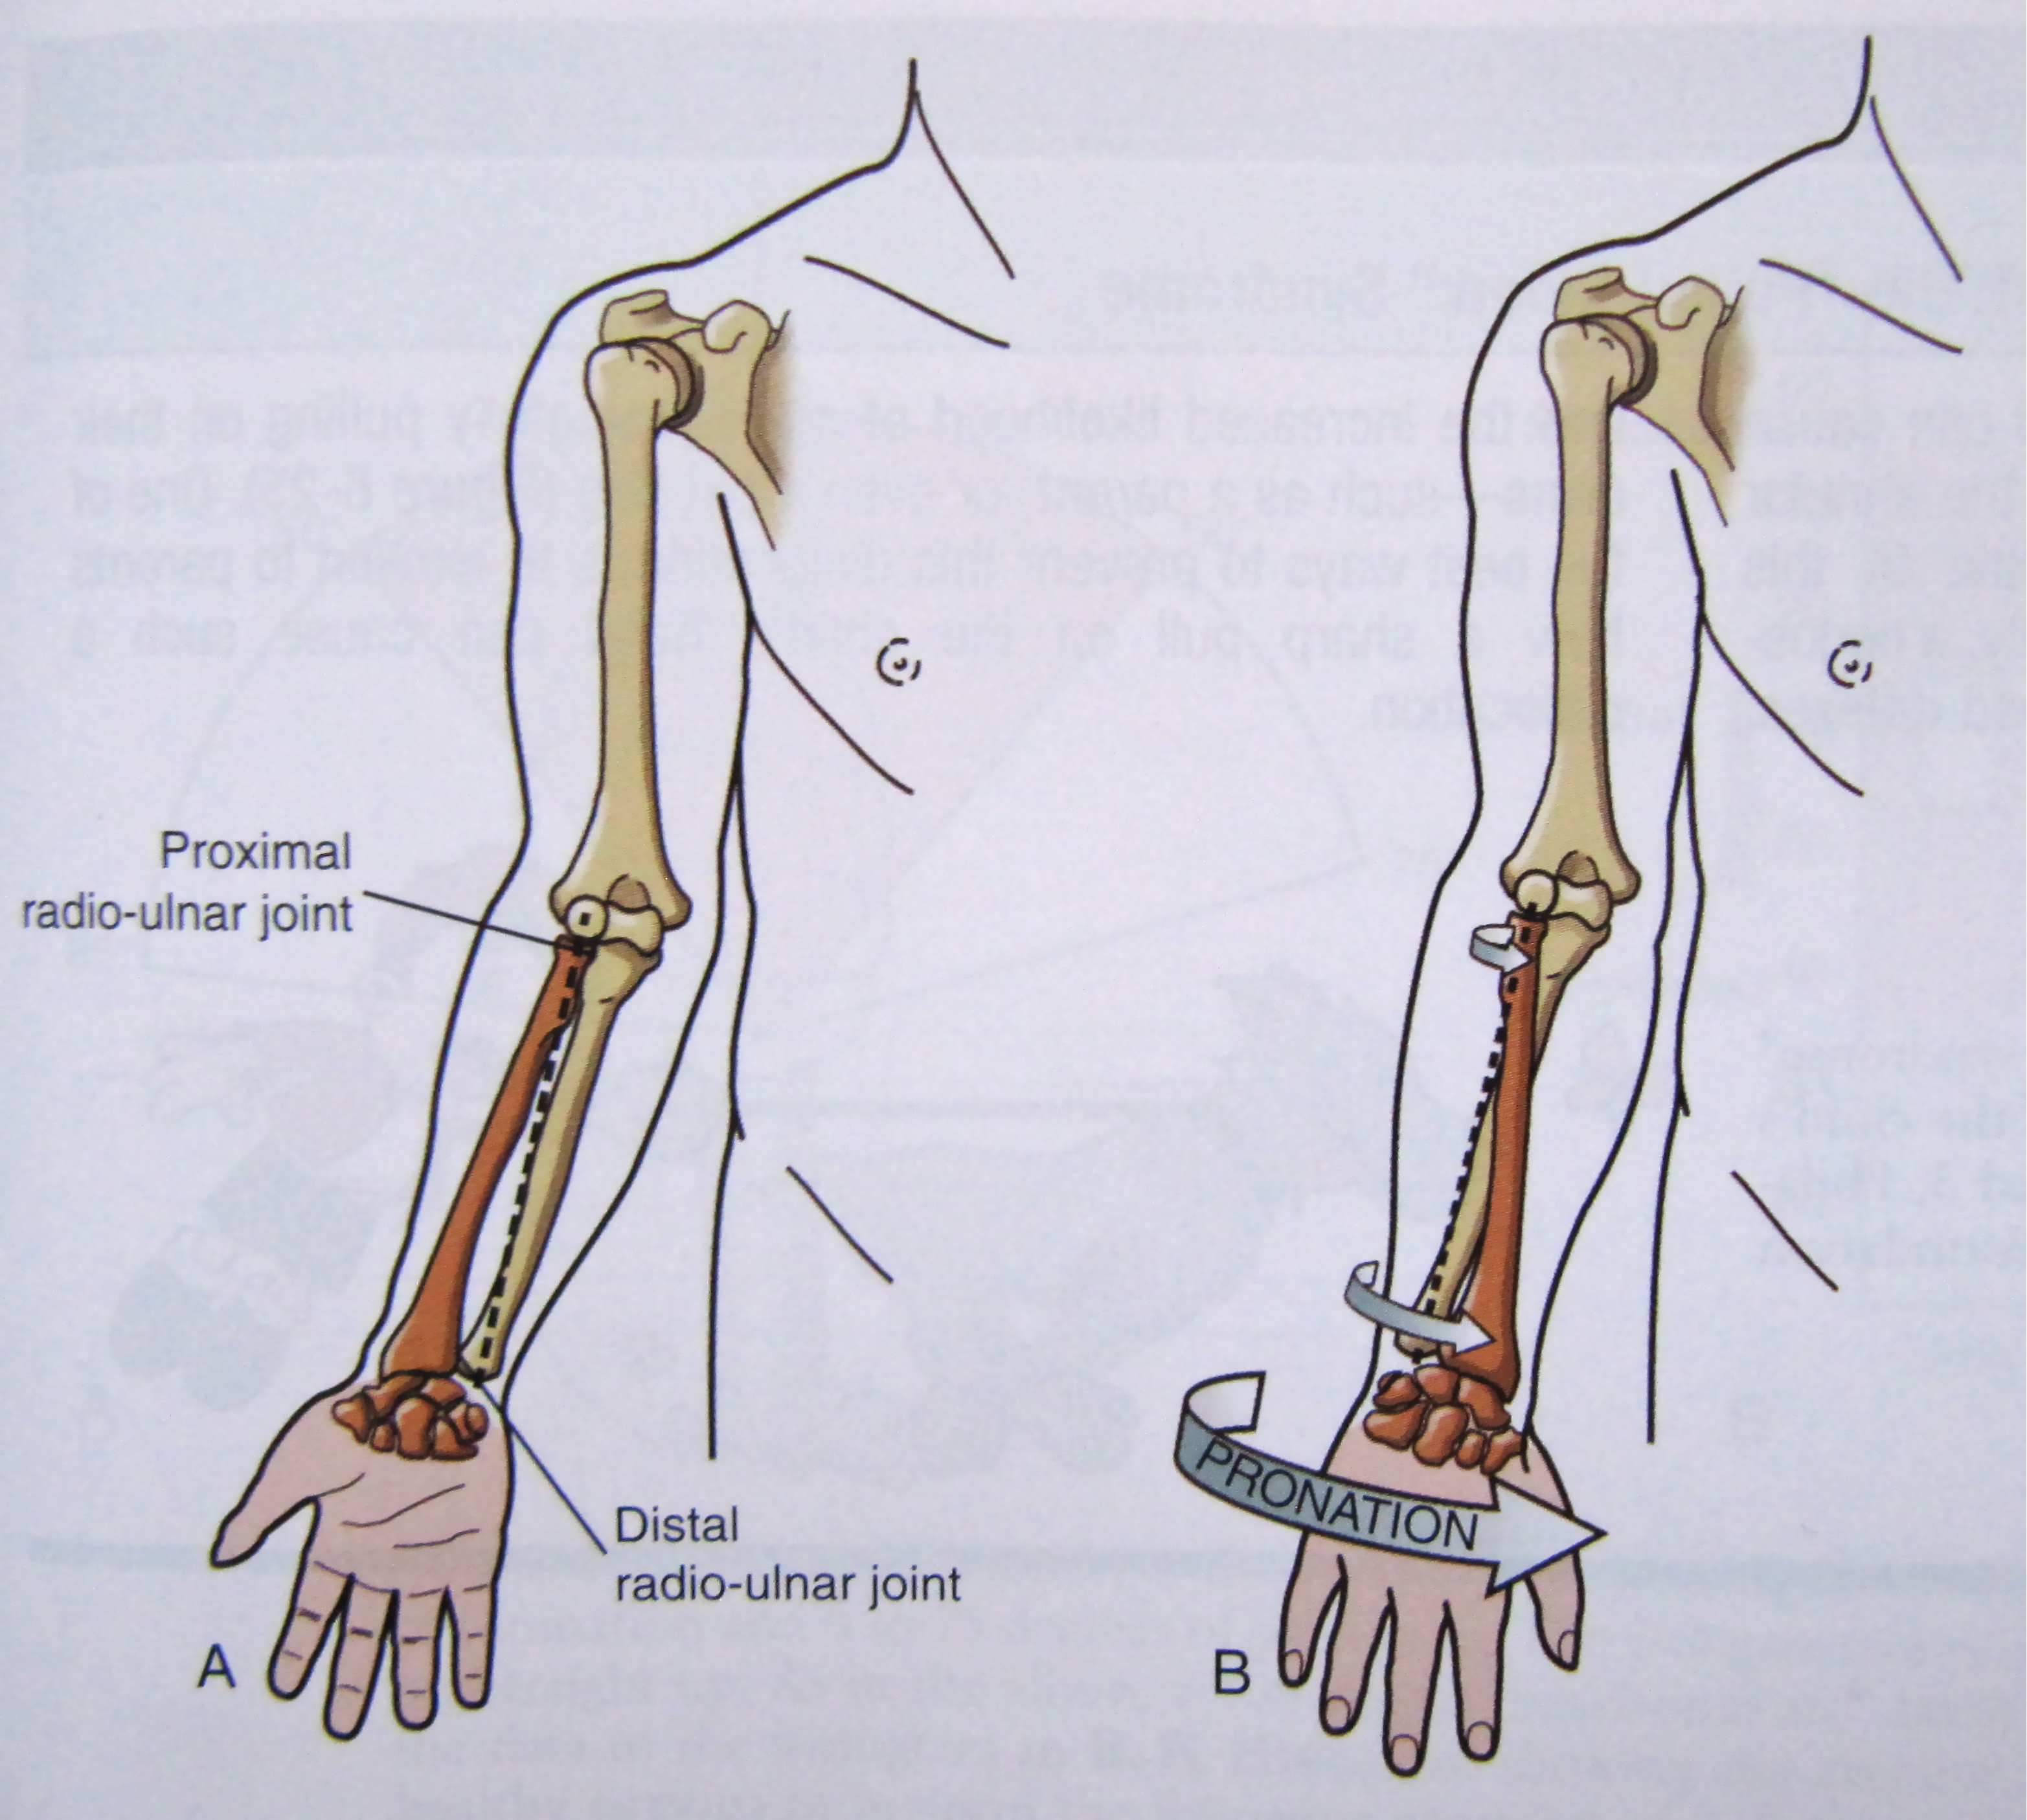
This image, from Doctor Bruce McFarlane's BLOG, ITTCS, shows how the Ulna (shown in RED) and the Radius bones move when the wrist rotates.
I will update this post with my CAT rigging attempt from following the 3D Studio tutorial, with the adjustment I mentioned.
UPDATE:
I have rigged and partially skinned a model. I have not altered the Envelopes, so there is a lot of strange action going on, like stretching and the thighs morph rather bizarrely.
I have also documented my process with a series of Screenshots.
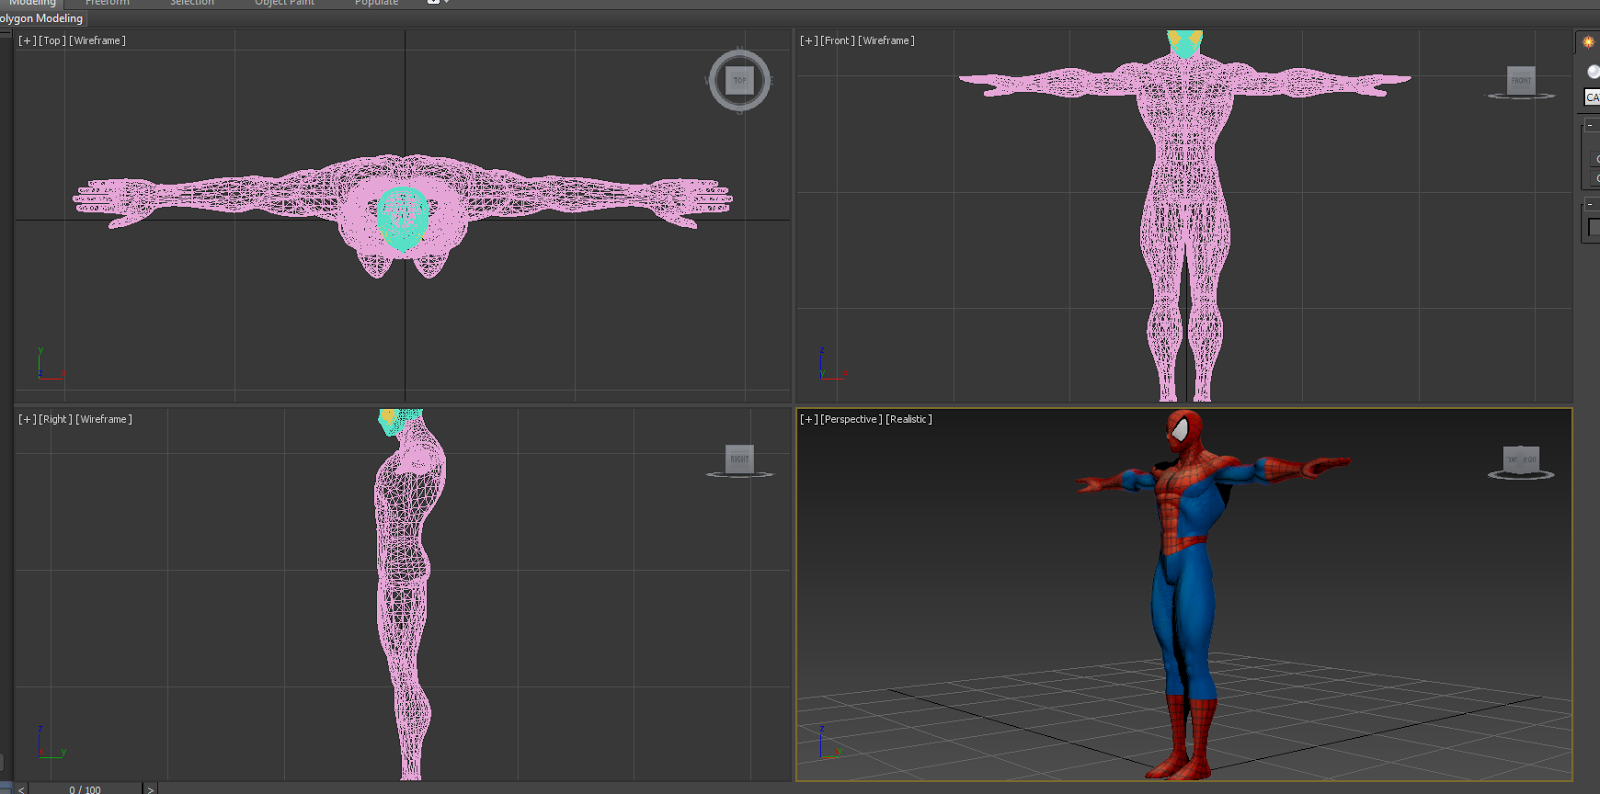 |
| Firstly I opened the Mesh file up. Spiderman is stood in a Tpose |
 |
| Selecting the Mesh, I pressed Alt + X to enable X-ray mode. I froze the mesh at this point for ease of rigging. |
 |
| I created a Base Human CAT rig from the Helpers Section |
 |
| In side view, aligned the rig with the meshes waist. |
 |
| CATUnits Ratio alters the height of the rig. I renamed the rig Spiderman_ so all of the components would be names, for example, Spiderman_LeftFoot |
 |
| I resized the waist to fill out the mesh and help aligning the legs. I also rotated it slightly. Using the Copy and Paste Mirror buttons, I placed the Legs. I also added an extra Bone to the feet. As the model is wearing boots, I don't need to make all five toes. |
 |
| I align the spine and neck to follow shape of the mesh. Moving the ribcage resizes the spine bones automatically, as does the head with the neck bones. |
 |
| I resize the ribcage to better fill out the mesh. This will help when it comes to setting the enveloping areas of skinning. |
 |
| Aligning the arms, I moved the collarbone slightly, then began setting the arms. I added the five digits to the hand and resized them using my own hand for reference, lining up the knuckles. I added an extra section on the forearm to represent the Ulna and Radius bones. |
 |
| Copy and Paste Mirror to set the other arm. |
 |
| This is how the mesh and model look when combined. I select the mesh, then apply a Skin Modifier. |
 |
| I use the Spiderman_Pelvis selection as my bones, then Ctrl+C to select all of the Children files within. This contains all of the bones I need, leaving out the Footpads and the main selector (the triangle with the arrow). As the mesh is separated for the neck, head and the eyes, I do the same with them. Without this, those sections will not be animated. |
As noted above, there are lots of things to be corrected. I have just uploaded this to show my working so far. My next steps will be to adjust the enveloping sections to correct the stretching.
I used the Motion section to animate Spiderman with a Sneaking animation. I have hidden the rig contained within.
L5 - ANIMATION AND SIMULATION
I've put together a Gantt Chart to help me complete my work. In the past, I've not done this (apart from in the VFX piece in semester 1), so I've made a point to get this done.
It only goes to Week 6, as the semester is split in two for this module. Week 1-6 is set for the animation, then the second half is for the Simulation part. Instead of a week 6 presentation, we are doing weekly updates in the lectures on Monday, making week 6 a final piece hand in.


It only goes to Week 6, as the semester is split in two for this module. Week 1-6 is set for the animation, then the second half is for the Simulation part. Instead of a week 6 presentation, we are doing weekly updates in the lectures on Monday, making week 6 a final piece hand in.
For researching human anatomy, I am making use of the Leeds Met library. I currently have booked out a book on Improvisation and performance by dancer and choreographer Miranda Tufnell and Chris Crickmay. The book is called Body, Space, Image.
I chose to use this book as it features some fantastic photos of performers contorting their bodies in dance routines, showing what the human body can do, and anatomical images of the human body.
I will be looking at other books and resources online to help, along with footage shot by myself.
Saturday, 1 February 2014
Ragdolling
Here's a render of the Ragdoll test.
The model uses a Ragdoll solver to generate the falling. I resized the effectors - if any of them are in contact, the model will instantly drop and "twitch" - to create the collision points. Adding a Rigid Body solver to the wall and setting it to Passive (so it doesn't move when hit), when the model connects with it, the animation stops and the ragdoll process begins.
The more time I spend on resizing and moving the effectors, the better the result.
I'm already getting an idea of what I want to do for the Motion Capture piece which would incorporate some ragdolling, perhaps!
The more time I spend on resizing and moving the effectors, the better the result.
I'm already getting an idea of what I want to do for the Motion Capture piece which would incorporate some ragdolling, perhaps!
Back to University
Monday is the start of Semester 2, Year 2.
I've been working through some Performance Capture stuff to prepare for it.
Things like using Ragdoll solvers and retargeting animation, plus refreshing myself with Motionbuilder. Now that I know what was going wrong with Semester 1's work, I'm in a better standing, with a much better understanding of the program.
I know where I messed up last time, so I know what to change. I'm going to try and stay ahead this time. My results from S1's projects were not what I was happy with, but they were passes at least. This time, work harder and focus. Don't plan over elaborate sequences, which I did for both the animation and the VFX pieces. Know what I want to make within the first couple weeks, ideally right away, something which I slipped up on with the 3D modelling project.
This year I will have a lot more time to focus on my work, something which was messing me up last time. I left work at the end of the first semester. It's just as well I did, or I wouldn't have had enough time to finish my projects. The last couple weeks were balls-to-the-wall, constant work, all nighters. I'd like to avoid this this time as much as I can.
When it comes to uploading work, it's getting done from University and well ahead of time.
I will be keeping a better blog, too. Showing more development work, which I was lacking last time.
Really, first semester was a travesty for me. The only positive is that I have learned a lot from it.
I also want to do a little bit of personal project, too. This will mainly be if my Uni projects are going well, but I'd like to think that I can do a little bit of work, even if it's just some drawings for it, just to keep it fresh, you know?
Wish me luck!
I've been working through some Performance Capture stuff to prepare for it.
Things like using Ragdoll solvers and retargeting animation, plus refreshing myself with Motionbuilder. Now that I know what was going wrong with Semester 1's work, I'm in a better standing, with a much better understanding of the program.
I know where I messed up last time, so I know what to change. I'm going to try and stay ahead this time. My results from S1's projects were not what I was happy with, but they were passes at least. This time, work harder and focus. Don't plan over elaborate sequences, which I did for both the animation and the VFX pieces. Know what I want to make within the first couple weeks, ideally right away, something which I slipped up on with the 3D modelling project.
This year I will have a lot more time to focus on my work, something which was messing me up last time. I left work at the end of the first semester. It's just as well I did, or I wouldn't have had enough time to finish my projects. The last couple weeks were balls-to-the-wall, constant work, all nighters. I'd like to avoid this this time as much as I can.
When it comes to uploading work, it's getting done from University and well ahead of time.
I will be keeping a better blog, too. Showing more development work, which I was lacking last time.
Really, first semester was a travesty for me. The only positive is that I have learned a lot from it.
I also want to do a little bit of personal project, too. This will mainly be if my Uni projects are going well, but I'd like to think that I can do a little bit of work, even if it's just some drawings for it, just to keep it fresh, you know?
Wish me luck!
Subscribe to:
Posts (Atom)